 Pattaizer -
Help Pattaizer -
Help |
Pattaizer -
Help
Tune the pattern
When a pattern is chosen the amount of deformation, size etc. can
be tuned by the deform control parameters (see here).
Other parameters that are available can be found in the Pattern options (picture below). The left bottom picture can be considered as a default result. Pattern options 'Degree source blend' is the measure to what extend you
want to still see some of the original image. The blend varies from 0 to 50%
(which is reflected by a value of 100, illogical perhaps...). The blend will only
take place where the colours are is actually a part of
the pattern. For instance the spirograph pattern typically has a white
circle in the centre, and can also be void/white at the outside. These white areas
will not be blended with the source image
.
'Clip blend
edges': when checked, the edges of the underlying picture will be clipped (also known as
a variant of 'cropping'). The amount of clipping is changed with the slider. In the green picture below, the effect of
this setting is made visual. A value of 0 indicates that no
cropping is done, so the full picture is used for blending. A disadvantage is that
in some cases the original picture becomes visible. A value of 20-40 is usually a
good balance between filling the white spots and a barely visible underlying source
picture. The picture below shows the effects of the two sliders blend and clip edge.
A slight blur is applied before blending the clipped original with the
pattern. 'Skip centre area': when this
tickbox is checked the centre part of some patterns is not coloured, and left
(white). This is typically the case for circular patterns, like spiral and
spirograph
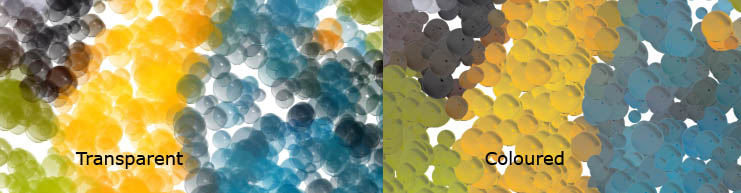
. 'Glass FX' (only available for
spheres): the bitmap for the glass FX is used to create a kind of 3D effect for
each circle. This effect will manifest itself in two different ways: as a
transparent glass (sphere), or as an opaque glass (sphere). We emphasize the
'sphere' aspect here because the glass effect is always made with
circles. Using a non-circular bitmap for the glass effect may have interesting
effects, however it's intended to create spheres as the actual pattern. When the
effect is active you can select the type of effect in the controls set for
spheres ('Transparent spheres' or 'Coloured spheres'
). 'Apply tube shade': when this tickbox
is checked the tubes (Hor and Ver) are shaded. The amount of shade is indicated
in the slider in the Deform control. A typical example is shown below: a picture of a plastic
snake in a horizontal tube pattern. 'Keep shape' is a special setting only
valid for circular patterns (circles and spirals). If checked the resulting
pattern cells have a more consistent size ratio of width over height. This way a
more evenly sized circular pattern will be generated.
Video options The following options are available:
General settings The controls which are
always visible
The following
options are always visible in the GUI. These are typical values that you'd like
to change frequently, or
deliberately for whatever creative reason. An example of pen
thickness (line width) is shown below. Left =
pen
thickness of 1, right =
pen thickness of 5 pixels. Some examples of
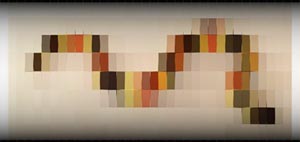
the spirograph The spirograph
has 6 different controls. The effect of a control is very hard to explain in
words, so we use a few examples. Please be informed that these examples have
specific random colours which we created specially for this documentation chapter. So... these cannot be made with
the application.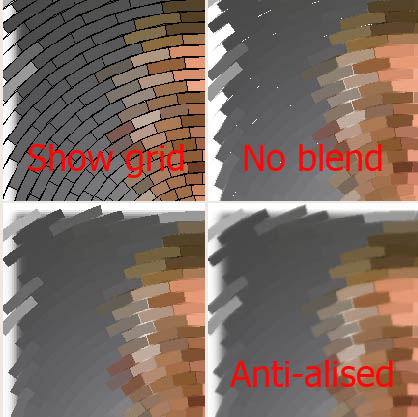
The following options are available for pattern tuning (please
note that not every option is applicable to every pattern). The picture above shows some
typical effects when these options are active or not.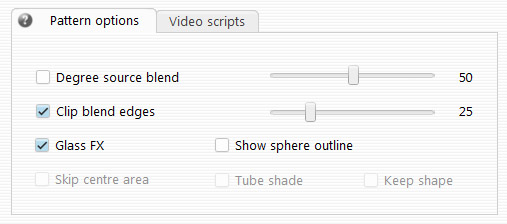
Note:
changing the 'Clip blend edges'
only effectively works for pictures
that have coloured edges since a picture already having a white edge will
not become whiter.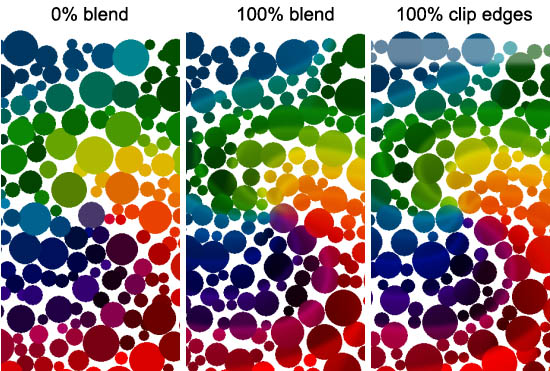
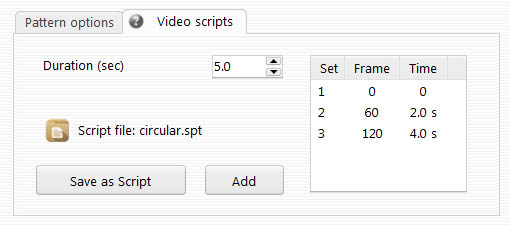
For grid/mesh-based
pattern where parameters can be changed (typically with the control sliders), a
video options is available. This option will allow defining sets of parameters, 2 at least,
together with a duration of video time to change each parameter from one set of
values to the next. There is no limits on amount of sets, and no limit to which
parameters can change. The only limit may be your patience to wait until the
video is finished. In the interface below you'll find the possibility to save
the sets of parameters in a script file. In the video part of the application
you can manage the actual video creation, using the sets defined here, as well as reading an existing script file, and then render the
video in the video creation window. To open the video creation, press the
'Video'
button in the main GUI.
The following options are
available for pattern tuning (please note that not every option is applicable to every
pattern).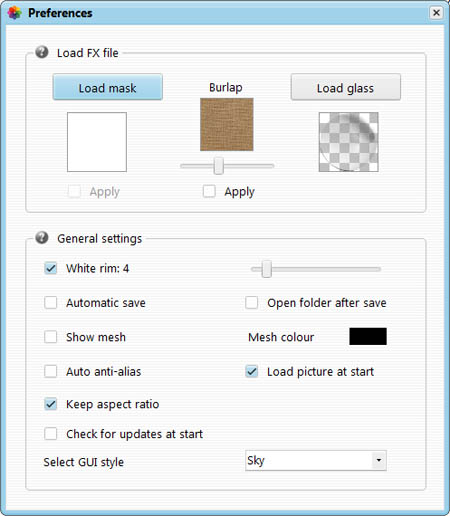
'White rim': a thin white border is added to the source picture. This way the
edges are correctly taken into account when the pattern is created.
This will typically take effect for patterns that has a certain randomness
(so: less likely effective for tubes and
hexagons).
'Automatic save': every time a pattern is generated the
result is saved. The save location can be opened via 'Windows' 'Show save folder' and the look for the
picture 'Result.jpg'.
'Open folder
after save': after the result
has been saved manually ('Files' 'Save picture') the save folder will be opened in
a new instance of the Windows Explorer.
'Keep aspect ratio': Pattaizer is optimized for square patterns, and will
therefore need to cut-out parts of the pattern when non-square source images
are used. This options assures that the resulting pattern keeps the aspect
ratio, but also needs to tweak a little to make the edges correct. Although
deemed superfluous, the option is added
for creative people who want to see how to stretch the features of
Pattaizer!
'Auto anti-alias': because the patterns are generated pixel by
pixel, sometimes the edges are a bit sharp or 'rough'. Anti-alias takes
away the sharp edges between adjacent pixels and creates a slight blur to polish
the wayward pixels. The result looks generally better, but also seems to become
slightly 'out of focus'. In case e.g. Photoshop or Paintshop Pro is available,
the user is recommended to fine-tune the quality of the 'pattaized' picture with
these professional bitmap editors.
'Show
mesh': when checked the grid is shown in the pattaized picture as well
(only applicable if a picture is available). The colour of the grid is
black.
'Mesh colour': choose a colour of the grid/mesh
when you want to keep it visible. This only works if the option
'Show mesh' is active.
This option does not work for the
kaleidoscope pattern.
'Load picture at start': for a quick
start the last used image can be loaded and patterned. Since Pattaizer works
best with ready images, this option also supports to preserve a stable
application.
'Check for updates at start': when
you want to be sure to always use the latest and greatest version, keep this
options checked. Download is only done after you click 'OK' button, and
installation likewise. Nothing is installed
automatically!
'Select GUI style': by optimizing
Pattaizer to Windows 10, also new interface 'skins' are now possible. The
good news is that Windows 10 has a great HighDPI
functionality: Windows can enlarge its GUI from 100% to
even 150%, and Pattaizer will scale accordingly. You can select from appr.
20+ themed interfaces, which is kept, so next time you start you'll find
that theme of Pattaizer active. The theme does NOT affect any Windows setting
!

The
'Pattern' selection box. From
this pull-down box you can select the pattern you want
to apply.
'Wire frame only': when checked only the
pattern wire-frame is
shown and the picture is not pattaized (only applicable if a picture is
available).
'Auto-update
pattern': each change is
automatically done and is made visible. For large size patterns it may be useful
to un-check this possibility to save rendering time for each pattern tuning
change. In case 'Auto-update' is in-active the mosaic is only
updated after the user triggers the 'mouse-up' event (= releasing the left
mouse button).
'Paper' size in metric
sizes between A5 and A3, while licensed users also get A2 to A0
available
The 'Mesh size' is a control to set the
amount of grid points in the grid. The default pattern window is 600 x
600 pixels, so a default value of 20 pixels per cell equals to 30 x 30 cells,
a cell size of 15 pixels equals an initial grid size of 40 x 40 pixels etc.
The purpose of this parameter is to speed up the process of pattern design and
tuning. This value is most useful with non-circular
patterns.
A small
cell size creates a large patterns (much pattern creation time required),
but the effect is pretty realistic on a large source picture. Not always
wanted, such as for pinch and blow and for the tube patterns
A large cell size creates a very simply pattern
maze, since the amount of cells are however low, the pattern tuning is much
faster
The value of
'Line' is the pen thickness of the
grid. Default 1, max 5. This parameter may be useful to create special effects
because the grid lines are subject to background picture blending (see
also Tune the pattern -
Blending).
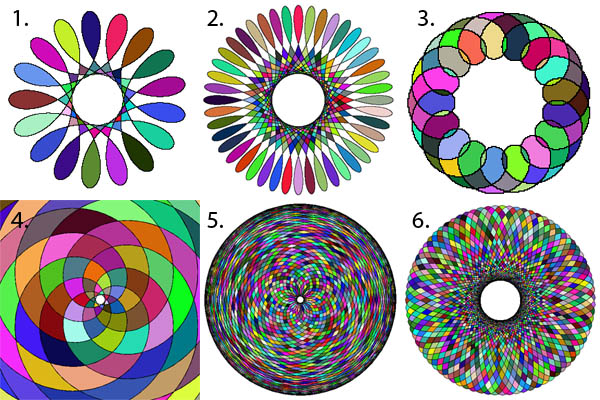
Slider name
1
2
3
4
5
6
Description
Outer radius
-85
-88
-68
-35
29
-79
Initial radius on spirograph
Inner radius
65
26
76
-85
-85
38
Additional radius of spirograph
Off-set
-29
9
-53
-41
25
25
Correction of the centre size
Rounds
53
63
79
99
99
41
Number of pen-rounds
Angularity
100
100
100
59
59
59
Accuracy of the circular increment
Size
26
26
34
25
25
25
Scale of the
spirograph
The outer- and inner radius and the off-set work together in a mathematical way, which is not very accurately described above. For those who are interested in the mathematical formula: the horizontal and vertical position of each point of the drawing pencil is calculated as follows:
The options for the
kaleidoscope
The kaleidoscope is a different pattern compared
with the others: this pattern can be generated by active user input only. The
mouse is used to literally draw the kaleidoscope pattern. The kaleidoscope is
therefore not subject to scripting, since there is nothing to automate. The kaleidoscope has a few options:

The amount of
mirrored lines can be chosen: '2x', '4x' or '8x'.
The other option is to 'Show the picture
area': when a picture is opened
the current kaleidoscope surface is erased to fit to the size and format of the
new picture. Since this pattern is by default a circular (=
mirrored)pattern, the canvas will be square.
To locate the picture boundaries, a lime-coloured rectangle is shown. In
addition, also
a very faint version of the source image will be shown. Both of
these supporting features may help to tune the pattern for the actual area of the picture.
When the option 'Auto-update pattern' is
ticked, the mosaic is automatically recreated after releasing the mouse after
drawing a pattern. In unchecked the user has to manually click the 'Update mosaic'
button.
Options for free drawing
Basically, free drawing is identical to the kaleidoscope pattern. The only difference is that no mirroring is done, and only the single (mouse) drawn line is used. All controls are therefore similar to the kaleidoscope, where the 3 checkboxes to select the amount of mirrored lines are now hidden. To better master the shape of your line it is advised to purchase a pen-tablet. We recommend the Wacom Bamboo.
Tip: when holding the 'Shift' key and clicking on the pattern area, the centre of the 'Circular' and 'Twirling spiral' pattern is
positioned at the mouse pointer.